Automate Your Social Media Workflow with n8n: From Idea to
Publication
Managing social media content consistently can be exhausting especially when it involves back and forth approval, creating visuals, and publishing on multiple platforms. But what if you could automate most of that process? That’s exactly what this n8n workflow does.
In this post, I’ll break down a complete n8n automation that helps you create, approve, and publish social media posts without losing control or quality
Why This Workflow Matters
For social media managers, solo creators, or content agencies, this n8n automation is a game changer. It cuts down repetitive tasks, reduces human error, and keeps your publishing calendar consistent.
Want to try it for your own use case? You can adapt this flow using:
- n8n cloud (for quick setup)
- n8n self-hosted (if you want full control)
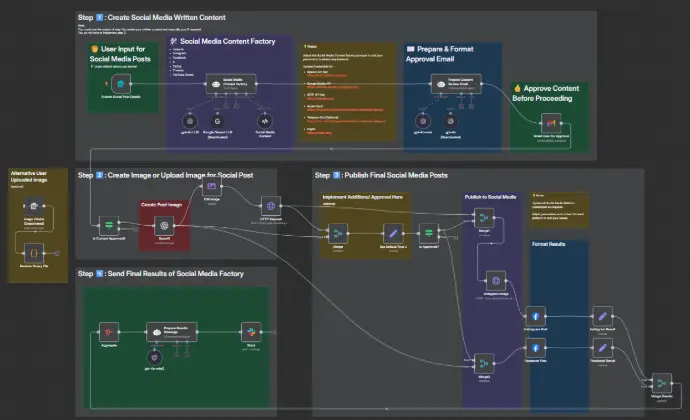
Step 1: Create Social Media Written Content
This is where everything starts. The user fills out a form to input basic ideas or post details. Once submitted, the content gets passed into a GPT-powered "Content Factory" that generates engaging captions or post text for various formats like:
- Instagram Captions
- Twitter Threads
- TikTok Titles
Once the content is ready, an approval email is automatically generated and sent to the content approver for review.


Step 2: Create or Upload Visuals for the Post
Visuals are essential for social media. You have two options here:
- Upload your own image manually
- Let the workflow generate a fresh image using Open AI's DALL·E or similar tools
You can even include basic editing like resizing, optimizing, or renaming the image before sending it to the next stage. This step is conditional: it only runs if the content has been approved.
Step 3: Final Approval & Auto-Publish
Once the image and copy are ready, the post goes through a final checkpoint for approval. You can configure this part for auto-publish directly Or manual re-approval for sensitive campaigns
If approved, the system will automatically:
- Upload the image to social platforms (Instagram, Facebook, etc.)
- Post the caption/content
- Format the final output as a structured result


Step 4: Send Final Results to Team
As the last step, the system sends a summary of the final post (with links and status) to a Slack channel or any messaging app your team uses. You’ll always know what got published, when, and where—without chasing spreadsheets.
Final Outcome
By the end of this workflow, you’ll have:
- A fully written and approved post
- A matching image (generated or uploaded)
- Published content across your social channels
- Final results delivered to your team
